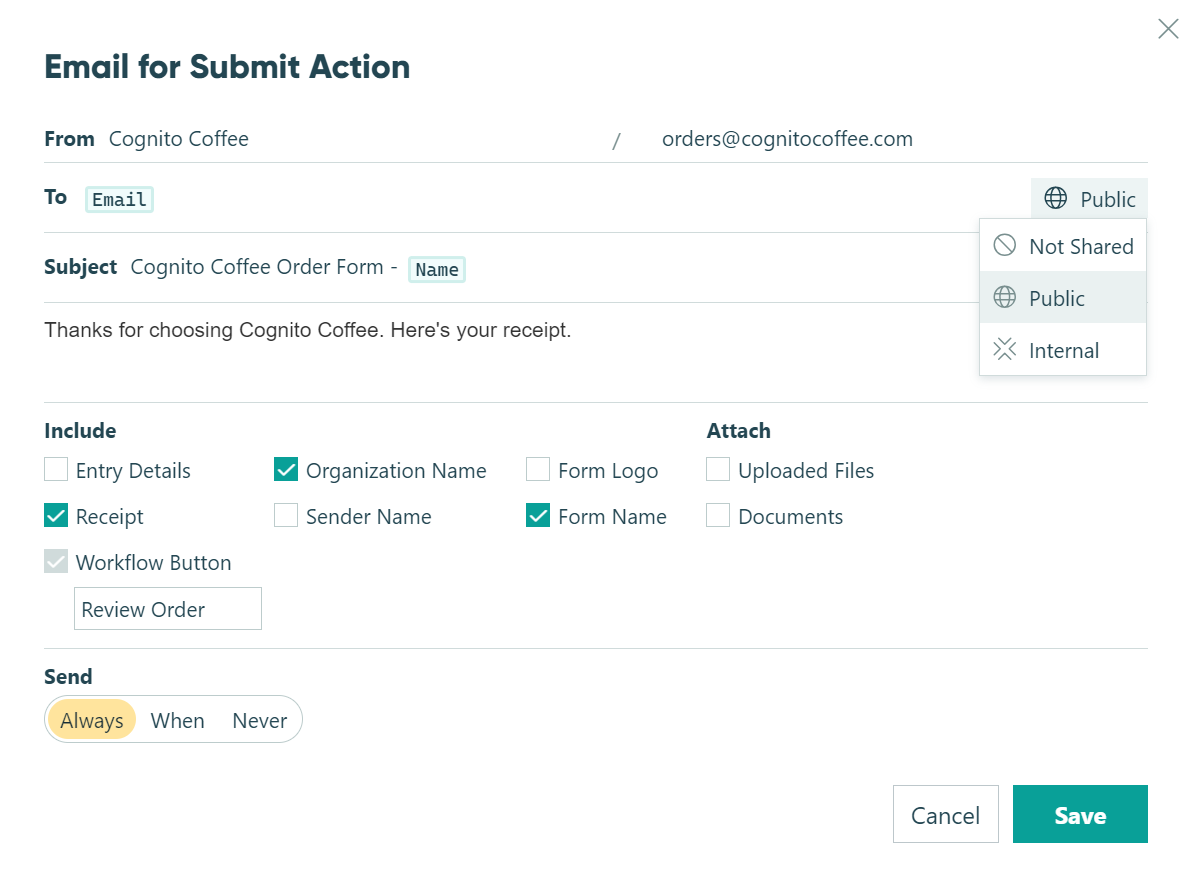
Workflow links are the driving force behind creating workflows in Cognito Forms. Sent via email, you can think of these links as the means to which any work gets done. When an individual within your workflow is sent a workflow link, they’re able to access role-based entry data as well as perform available actions on an entry.
You can control when these links are available, as well as who has access to them, through Workflow Link Sharing. And as you’re automating email notifications across your workflow, you’ll find you can easily send a workflow link with the right data, to the right person, at the right time.

Using Workflow Links
Because workflow links are tied to roles, you’ll want to first make sure you have the necessary roles for your workflow set up. Once your roles are in place, you can then create email notifications tied to actions that include these role-based workflow links. Making sure your email notifications include the correct workflow link will ensure the right people in your workflow are notified with the entry view intended for them.
As a reminder, a workflow link determines the role of the user when working with an entry:
- Public - The default role for new form submissions.
- Internal - The default role for new entry views.
- Other - An optional role subject to conditions set within your workflow.

Enabling Workflow Link Sharing

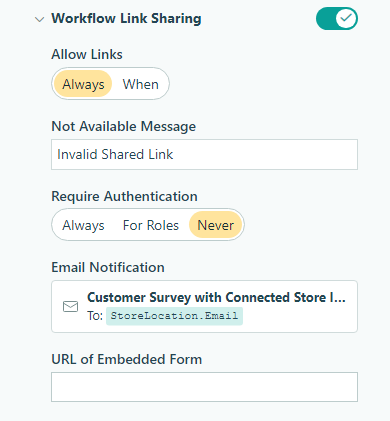
To enable Workflow Link Sharing, click Workflow at the top of the form builder. In the Workflow menu that opens, toggle Workflow Link Sharing to On if it isn’t already.
If you’re building a form that doesn’t need Workflow enabled, you can simply toggle Workflow Link Sharing to Off. You can also use this toggle to manually turn off Workflow Link Sharing once a workflow is no longer in use. Doing so will disable all previously shared workflow links.
If you’re collecting sensitive information on a form, you may want to consider toggling off Workflow Link Sharing to protect your form’s entry data from falling into the wrong hands.
Allow Links
You can include a workflow link in any confirmation message or email notification across your workflow. However, please note workflow links cannot be added to Documents.
Depending on the needs of your workflow, you can choose to Always allow workflow link sharing, or select When to conditionally allow it.
For example, you may want to discontinue the use of workflow links once a status moves to Complete. After selecting the When option, you can apply this logic in the conditional logic builder:

Or, you can set workflow links to expire after a specified amount of time (ex: 7 days). In this case, open the Advanced Editor under Allow Links and use the following expression:
=(Entry.DateSubmitted > DateTime.Today.AddDays(-7))
Not Available Message
Customize the message that displays when workflow links are no longer available. Use the formatting toolbar to insert hyperlinks/images and change the formatting of selected text. Please note that values from protected fields cannot be inserted into the Not Available Message.
Require Authentication
With the ability to configure authentication settings for workflow links, you can enhance form security and create a custom experience for every workflow participant.
- Always – Ensure that only organization members can access workflow links.
- For Roles – Require authentication for specific roles in your workflow.
- Never – Never require authentication to access workflow links.
Email Notification
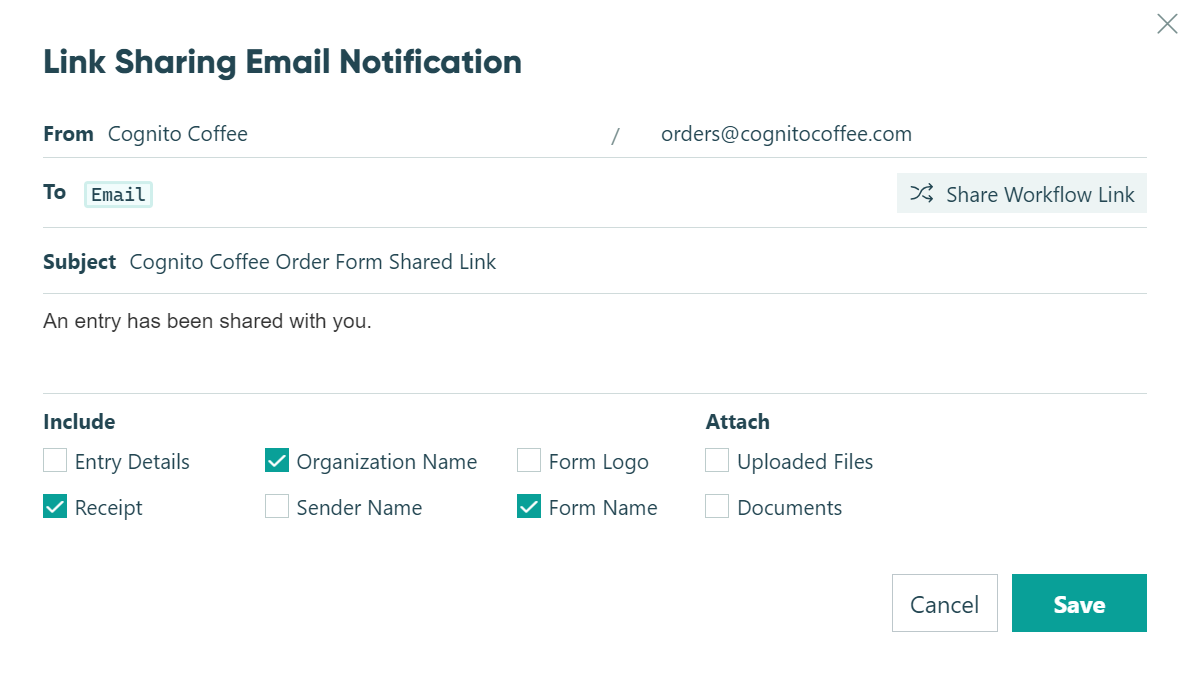
The email notification in the Workflow Link Sharing section, called the Link Sharing Email Notification, can be thought of as an email template used to share a workflow link on an as-needed basis. Since this email notification will be sent manually from the form entry view, it is unrelated to automatic email notifications triggered by actions performed on your form.
It’s helpful to set up this email notification even if you’re not sure how or when you’ll use it just yet. And depending on the complexity of your workflow, you can automate as much as needed. For example, if you’re creating an order form, you may want to use the Insert Field option to prefill your customer’s email address in the To field. Or, you can leave this field blank and manually update it when sending an email from the form entry view to an individual who needs to correct their entry after submission.
The template for the Link Sharing Email Notification is accessed from the Workflow menu in the form builder, however you’ll choose the workflow link role to be included in the email when sharing from the form entry view.
If you need help customizing this email, check out our email notifications page.

URL of Embedded Form
If your form is embedded, input the URL of where the form is located on your website into the URL of Embedded Form field. This will ensure form users are taken back to your embedded form when accessing a workflow link. If your form is not embedded, leave this field blank.